• Porsche 935
  • Porsche 956/962
  • Commissions
  • Special Editions
  • Original Co-Hogs
  • Your Co-Hogs
  • Blog
  • Contact
  • About
Menu

Co-Hog Toys

  • Porsche 935
  • Porsche 956/962
  • Commissions
  • Special Editions
  • Original Co-Hogs
  • Your Co-Hogs
  • Blog
  • Contact
  • About
Porsche G935 - 016 - Engine Bay Progress

Porsche G935 - 016 - Engine Bay Progress

June 2, 2023

The noisy end of a Porsche 935 is also the most complicated part - full of intense, power-producing, ear-splitting loud bits that makes it go like the Dickens. The Co-Hog G935 engine bays are certainly far quieter, but still filled with parts. They've been moved along considerably and it’s time to show some progress.

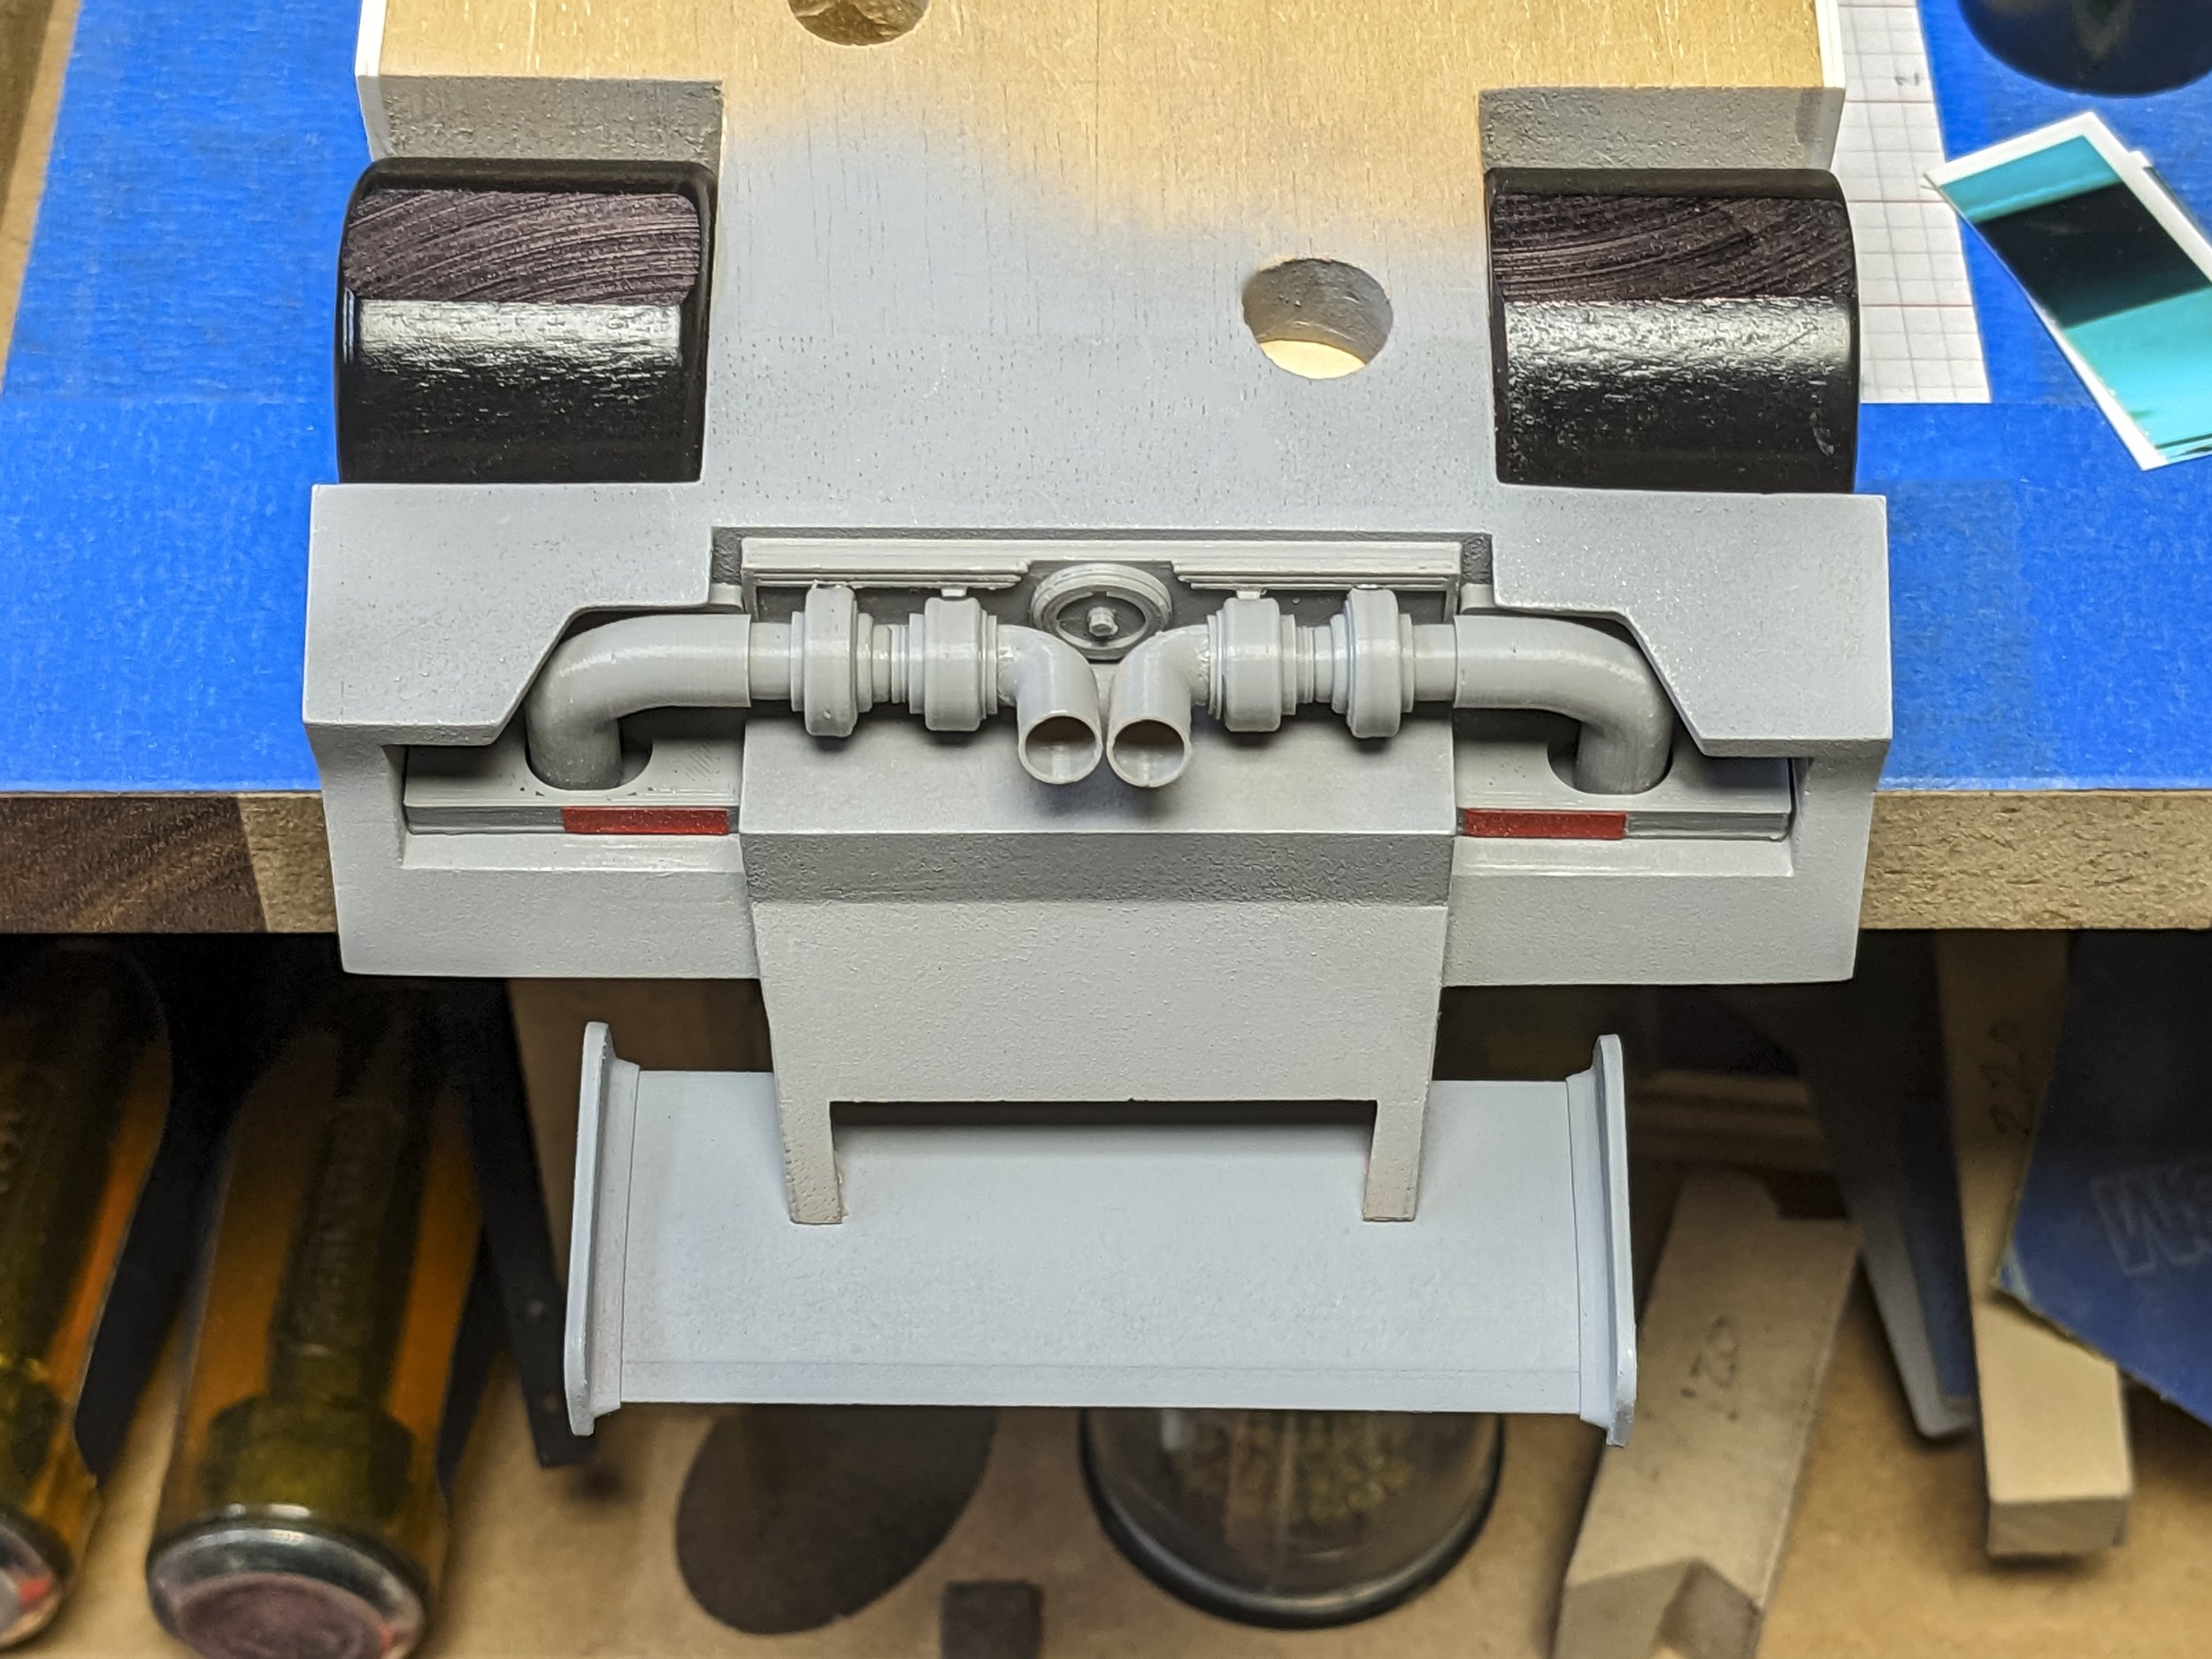
Posing sedately, G935 number one shows off it tail end. The engine bay has been enclosed with the addition of lower fender extensions and the engine and ducting 3D printed parts are close to their final sizing and positioning.

They still look pretty rough but 3D printing is no panacea for hard work!

Each small printed piece; there are 20 in total (including the wing and fender extensions) has to be scraped and shaped, then primed, filled and sanded three times before they're ready for paint.
Porsche G935 - 016 - Engine Bay Progress

A bottom view shows some of the key component connection points. The turbos each have slots that fit snugly over rectangular bosses on the main engine plate to help keep things in line. The turbos and ducting pieces are all socketed together at the ends for a tight fit.

The wing tips also socket onto the ends of the main wing for a strong joint. Not shown here are the right angle supports that will connect to the bottom of the wing and the wing struts to provide more surface area for final gluing.

The flat pieces with angles at each end of the turbo assemblies are the bottom fender extensions. They are separate 3D printed parts attached and blended into the main body. More on those later.

Porsche G935 - 016 - Engine Bay Progress

There are three main subassemblies; two fender vents & tail light mounts, and two turbo and hose subassemblies. The main engine plate is a separate piece.

Here you can easily see the stair-stepping that the printing process creates, especially on round pieces. The layer by layer additive nature of printing parts means that even vertical walls on the parts have to be filled and flattened.

The end result is faster than making each part from scratch, but other 3D printing methods do give finer parts, albeit at a higher cost.

Porsche G935 - 016 - Engine Bay Progress

All the scraping and shaping is time-consuming in large part due to the tough and stringy nature of the gray PLA (poly lactic acid) material being printed. There are dozens of other materials available for just about any purpose, but PLA is a good strong starting point.

To get better results I’m trying a PLA/Wood. It blends in 40% wood which does make the shaping process easier. The jury is still out on strength and overall workability.

Porsche G935 - 016 - Engine Bay Progress

G935 number one is the development mule and everything is worked out on it first before being transferred to numbers 2, 3 and 4.

The bottom fender extensions I mentioned earlier are below the top set of arrows showing where they’ll be positioned. The right angle wing supports will be used on the wing as indicated by the lower set of arrows.

It’s easy to see how the wing tips socket onto the wing ends for a good solid fit.

It’s important to get the inside of the engine bays almost done before adding the fender extensions. It’s difficult to get into the nooks and crannies for finishing after adding them. Final painting will definitely be a challenge.
Porsche G935 - 016 - Engine Bay Progress

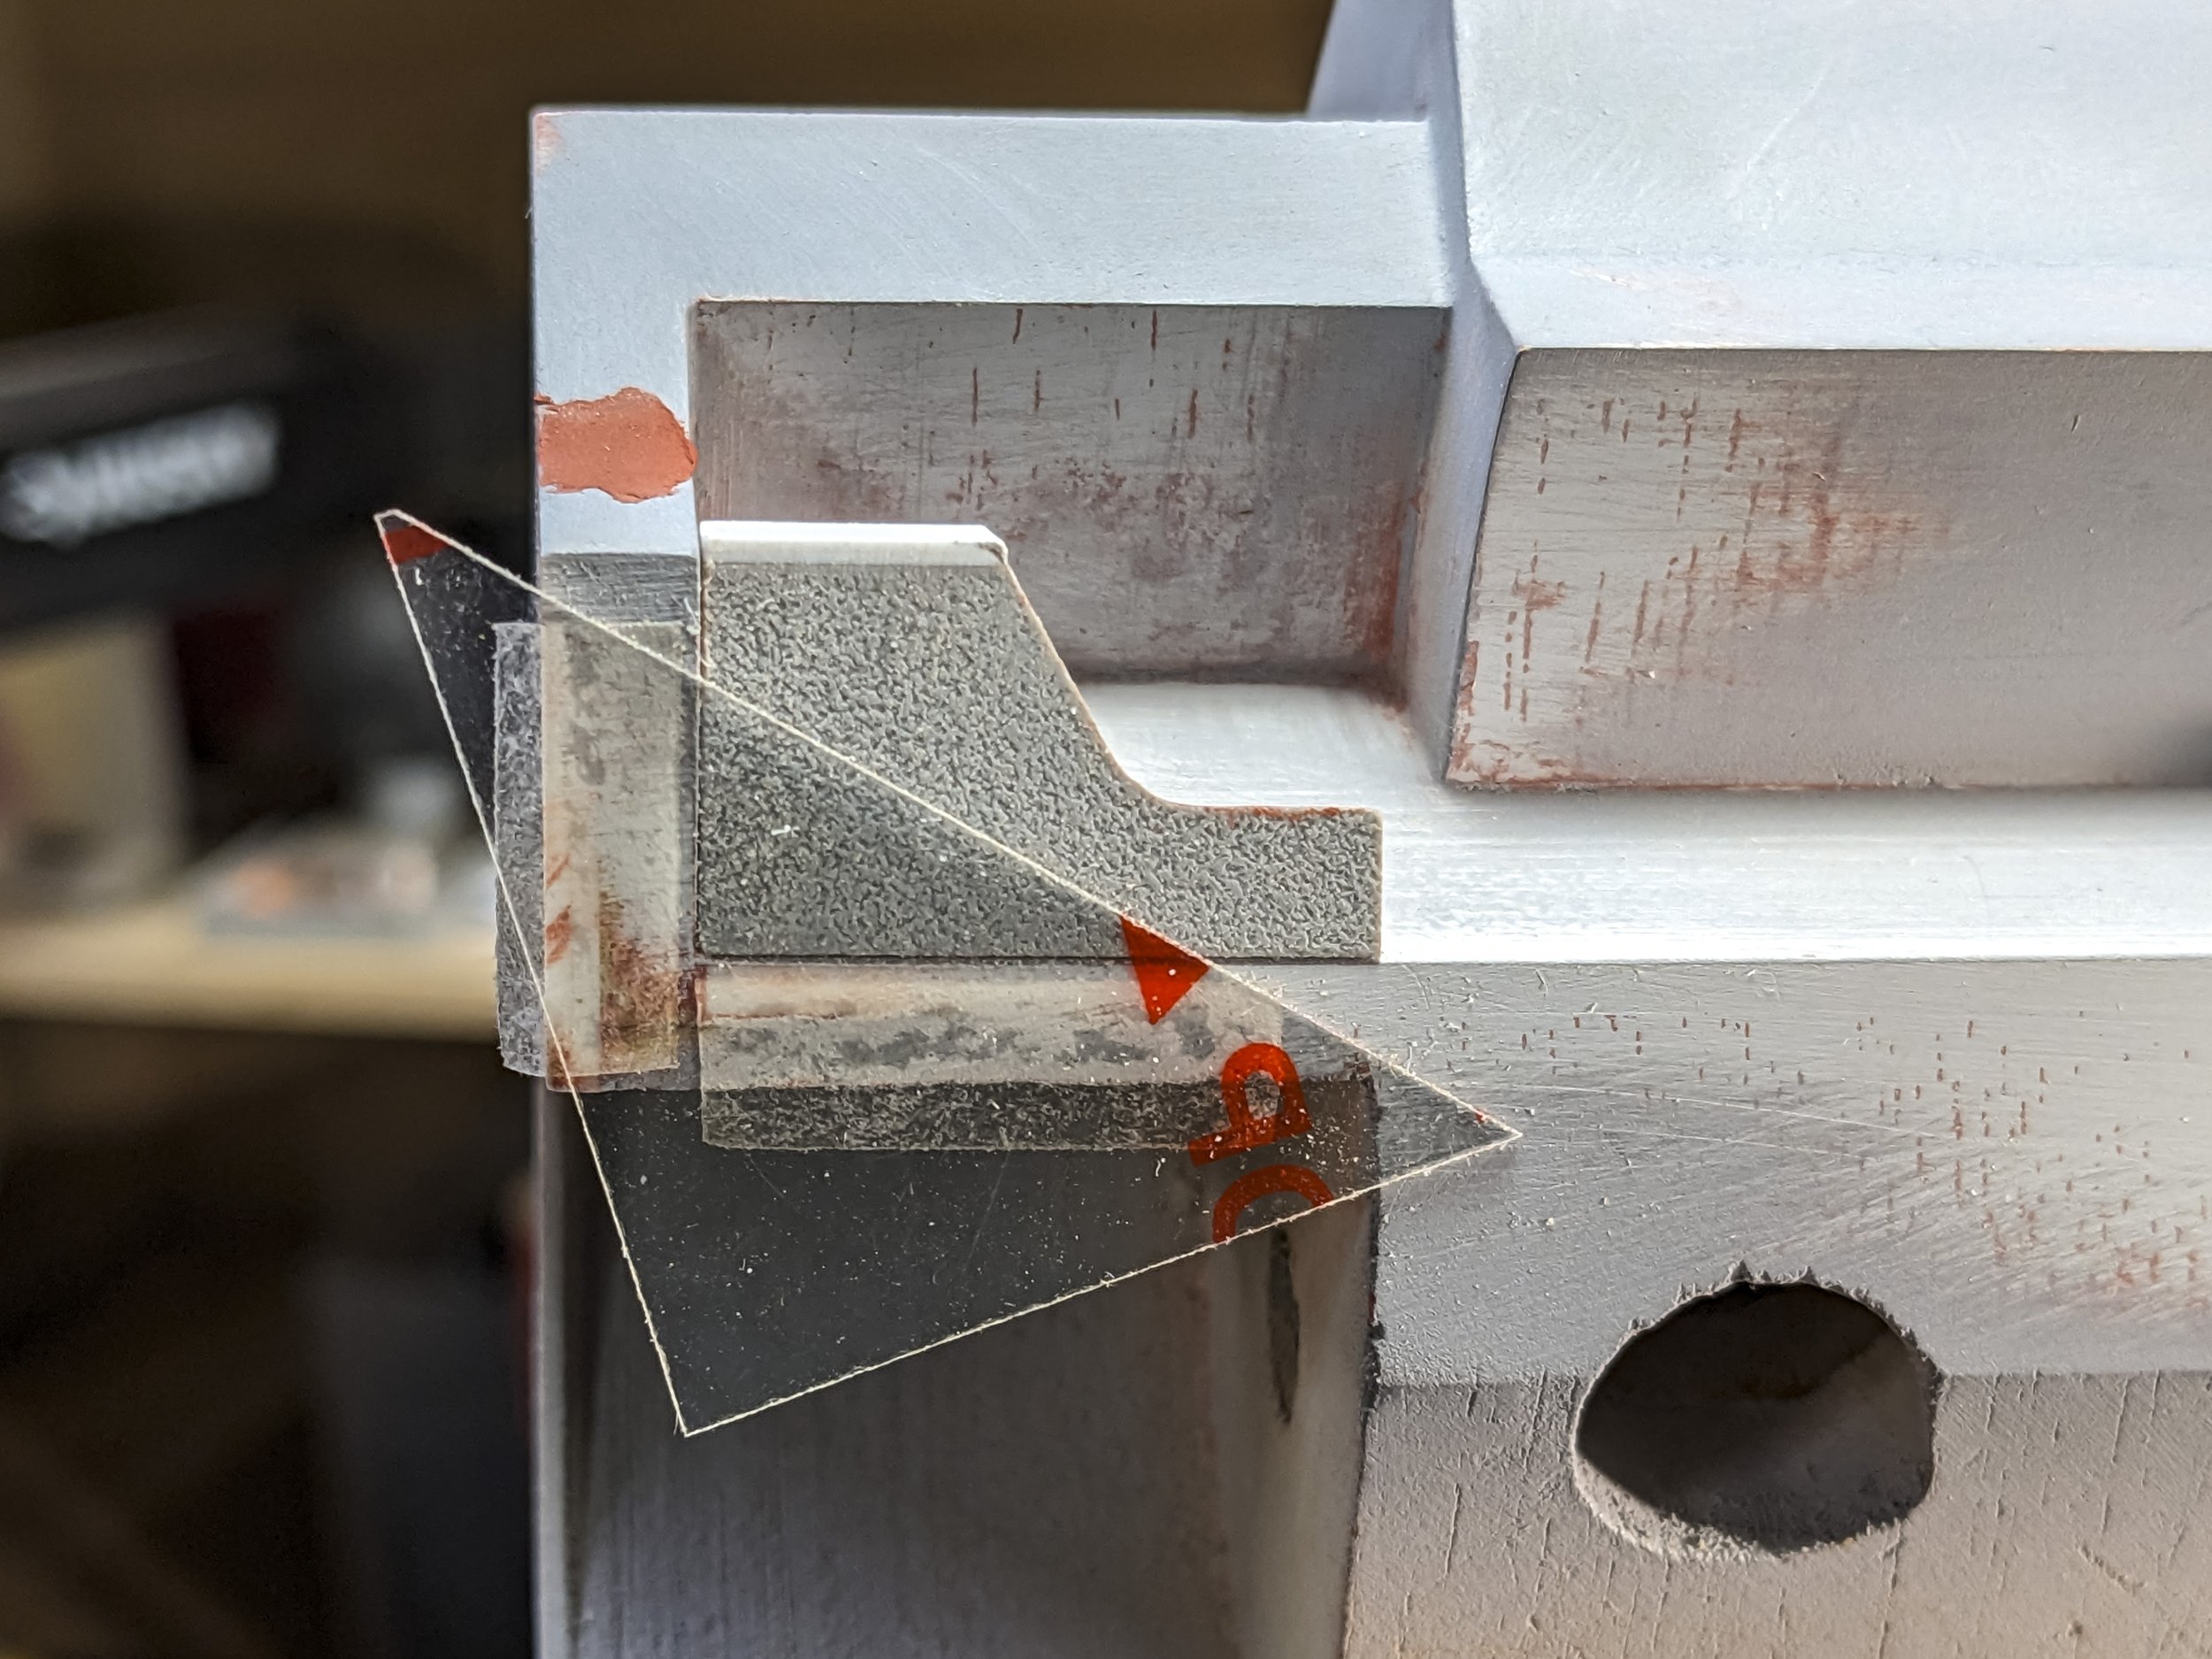
A clear plastic triangle was double-face taped to the bottom of the engine bay to act as a support during fitting and gluing in the fender extensions. All the angles make it interesting. You can see that I had to add two 0.010” (0.25 mm) styrene shims (the white layers) to properly reach the side of the fender.

This is also a good illustration of the jelutong finishing process. At the bottom of the photo you can see the unfilled pore lines. The angled surface above it has been sealed, primed, filled and sanded at least twice so far. The inside surfaces are closer yet to being done and the outside surfaces are almost done.

Porsche G935 - 016 - Engine Bay Progress

MCAD was a big help in making the fender extensions. First I made them in wood to get the shapes and details close to right. Then I translated those into MCAD and made more adjustments. Finally, they were 3D printed.

Even the flat printed surfaces require sanding and filling to make them right.
Porsche G935 - 016 - Engine Bay Progress

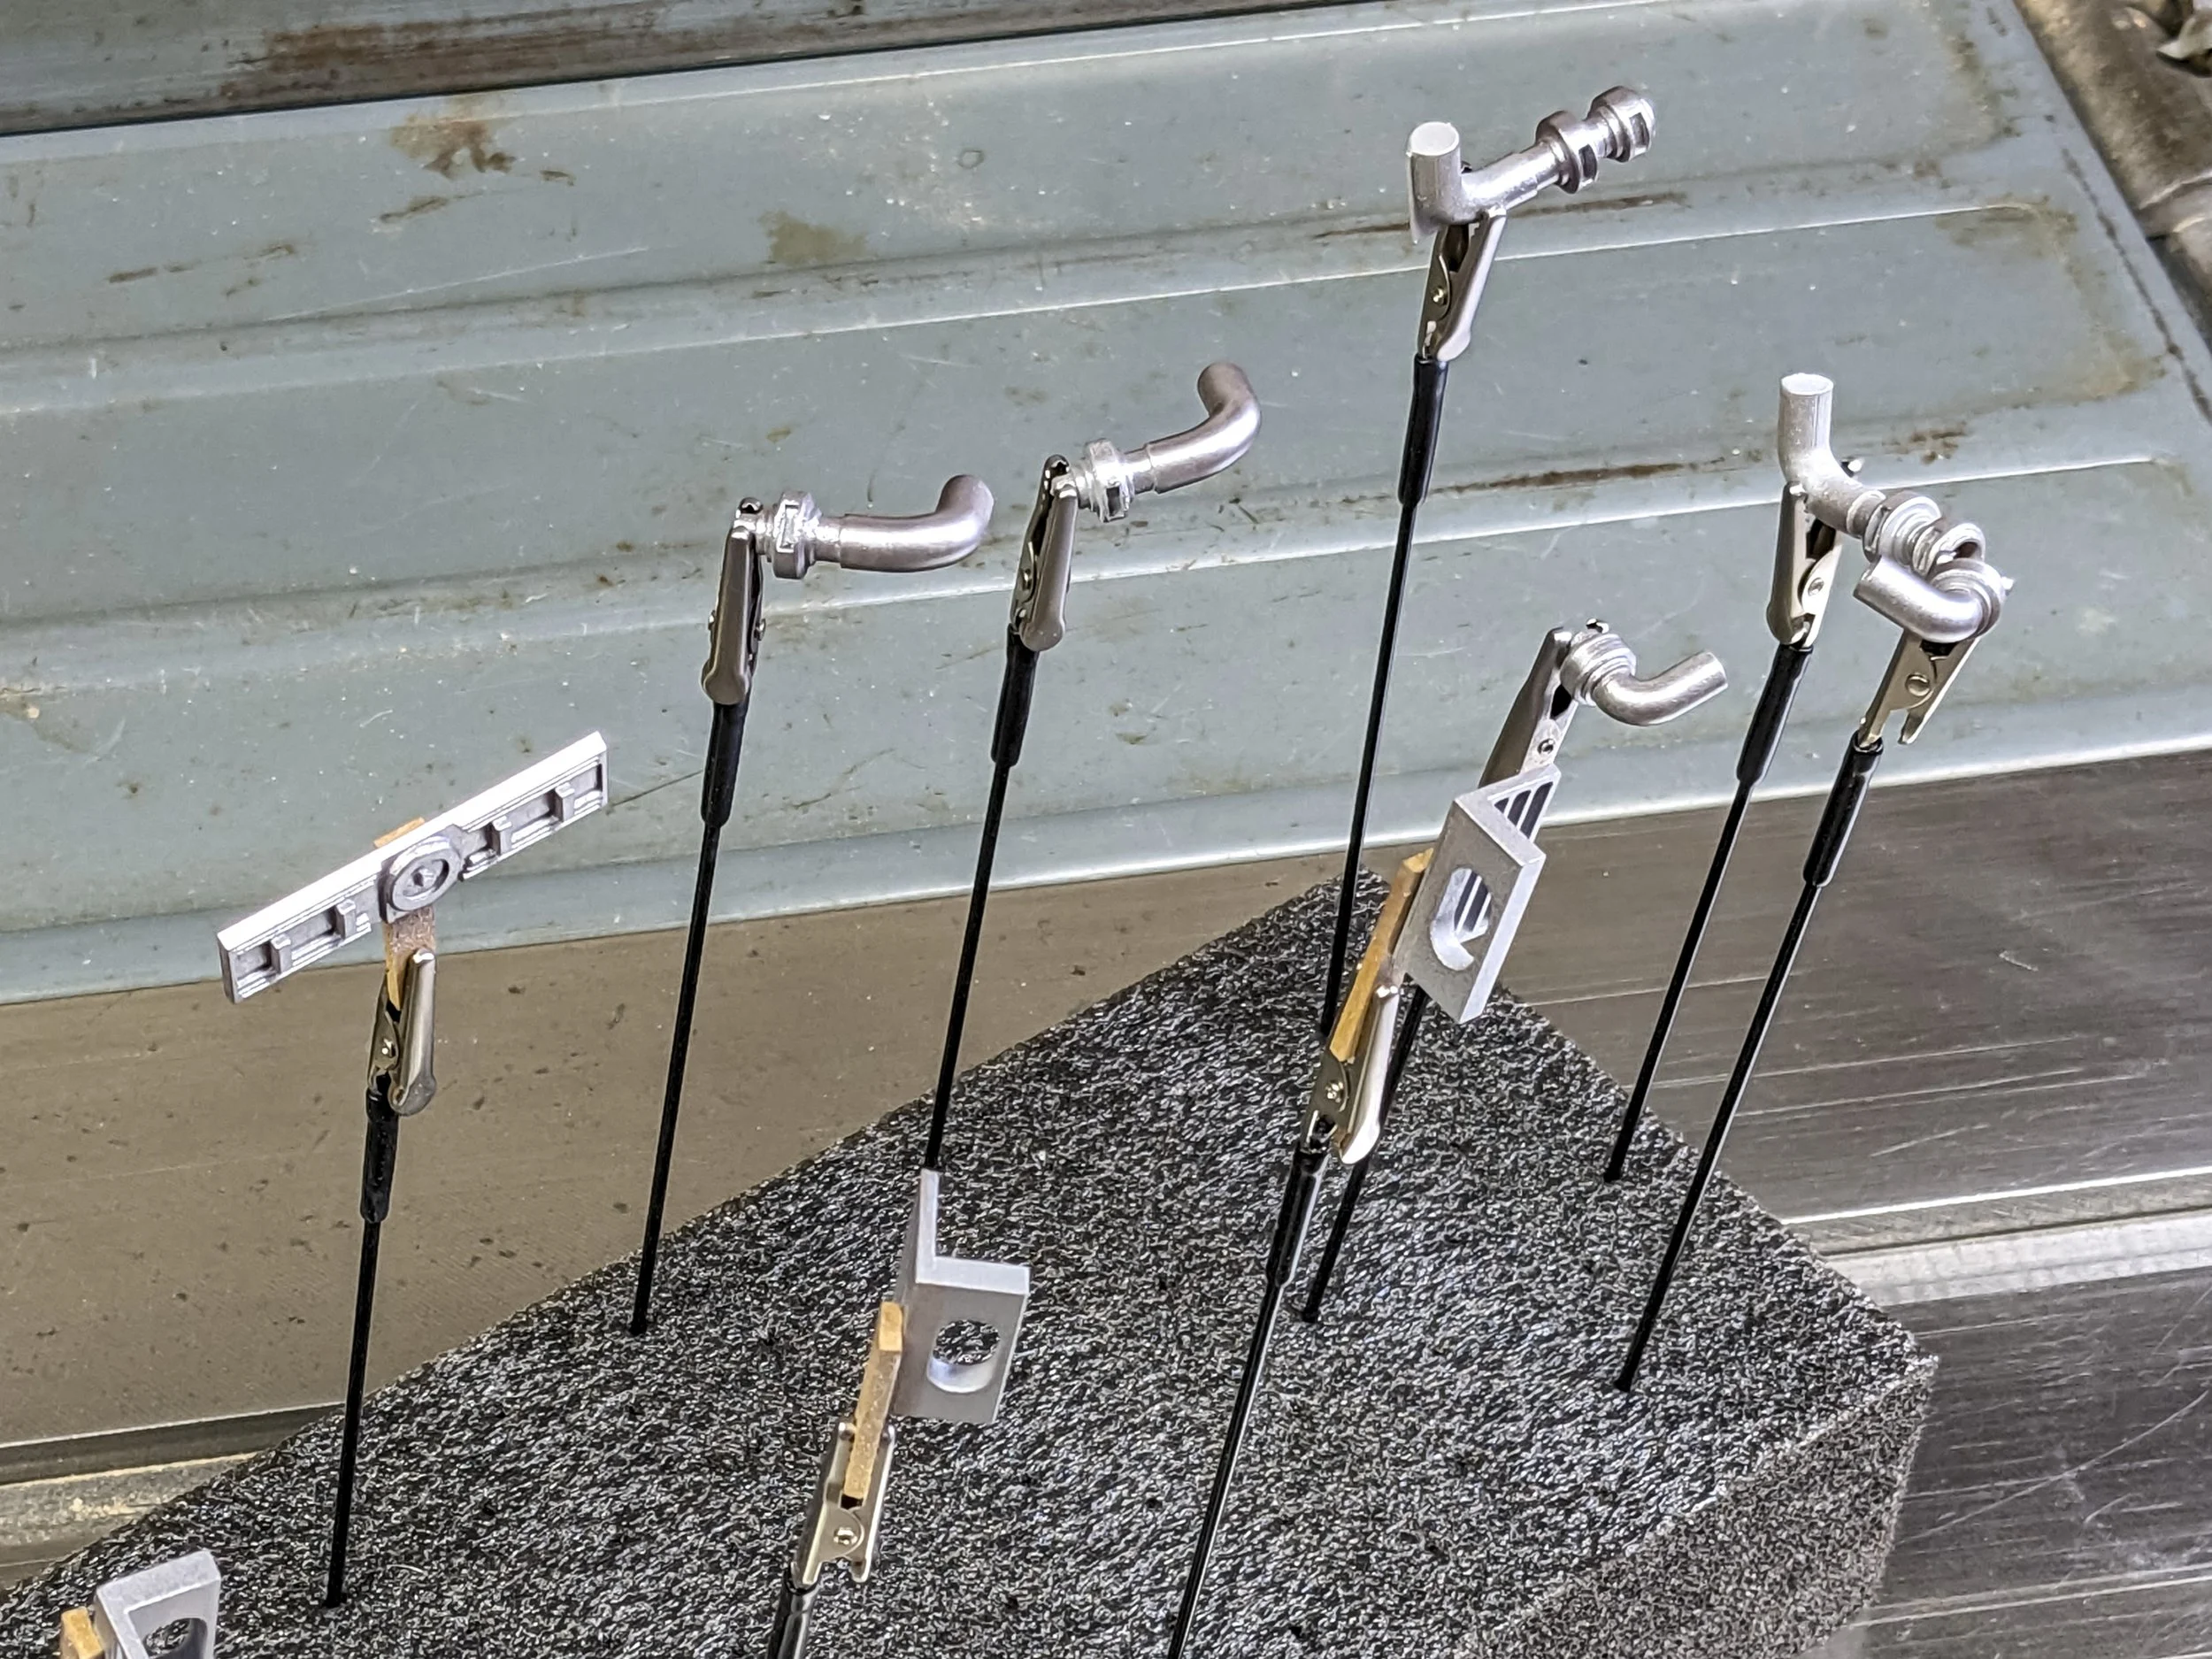
This is a set of finished pieces for one engine bay. The separate pieces were primed and filled, fitted together and then were given a base coat of silver water-based paint. Fitting them up before painting is a good way of masking those areas where the paint thickness makes assembly a problem.

Painting this way also provides a good use for many of the dozens of development parts because they can be used to properly mask and hold their respective mating parts. The gripping jaws can mark up the temporary mating parts while keeping the final pieces clean.

The turbo subassemblies remain together here. I’m working out final colors for most pieces and have to keep everything safely out of harm’s way.

Porsche G935 - 016 - Engine Bay Progress

Getting the finished colors to look right when together takes a series of trials. Flat palette boards and rounded spoons show each color and allow comparisons to help put together a potential paint scheme.

The amount of paint being mixed for these small parts is so tiny that adding exactly the right size drops of each color is difficult to match reliably. I'll mix my own colors once I know exactly what I want and can mix up larger batches.

Porsche G935 - 016 - Engine Bay Progress

This view of the AP Porsche 935 shows one solution to the color issues with a white body. Darker and more vivid colors will require some adjustments.

Next up will be even more progress on the engine bays - or maybe something else…


For more of the story click on any of the following links:

020 - Graphics - Clear Coat - Assembly

019 - Custom Wheels

018 - Ever Closer to Paint

017 - Overall Progress

016 - this post

015 - Fender Fandango

014 - The Wing

013 - Nose Shaping

012 - 2nd Skins Layer-Splitters

011 - Front Skins

010 - Intercoolers-Sills

009 - Wheel Wells

008 - Rear Fenders

007 - 3D Printing the Engine Bay

006 - Hood-Fenders-Air Dam

005 - Greenhouse

004 - Engine Bay

003 - Building Blocks

002 - Concept Revisions

001 - Starting Point


Back to top
← Ferrari 312 T F1 PrototypeCo-Hog BMW & Lotus - Tiny Handfuls →

Latest Posts

Featured
Special Edition - Mercedes-Benz 380SEC AMG
May 8, 2026
Special Edition - Mercedes-Benz 380SEC AMG
May 8, 2026

AMG came on in a big way in the late 60s by building exquisite racing engines. By the mid-70s they were tuning select Mercedes-Benz models into absolute beasts. The combination of a fierce engine and finely tuned suspension mods with more aggressive bodywork led to more than a few unsuspecting drivers wondering what the devil had just passed them.

Read more →
May 8, 2026
Lola T70 MK IIIB - 008 - Headlights Hurdle
February 6, 2026
Lola T70 MK IIIB - 008 - Headlights Hurdle
February 6, 2026

As you might surmise, there are no straight lines surrounding the Lola T70 Mk IIIB Coupe headlights. Such a sensuous body demands curves just about everywhere. Three-dimensional curvilinear lines abound. The original 1982 version of the Co-Hog Lola had subtle grooves to delineate the headlight shapes. The resulting interior surfaces were then painted silver. Seems it would be a simple proposition to duplicate the idea on the totally reshaped nose of this restored version. There was only one problem - I’d forgotten how I did them 40-odd years ago!

Read more →
February 6, 2026
Lola T70 MK IIIB - 007 - Stance Matters
October 3, 2025
Lola T70 MK IIIB - 007 - Stance Matters
October 3, 2025

Race cars have a stance that instantly catches and holds the eye. This effect is created by the relationship between the wheels and tires to the forms surrounding them. Aggressive, low, and ready to attack. The Lola T70 Mk IIIB Coupe is one of racing’s most sensuous race cars. It relies on its stance to help accomplish that.

Read more →
October 3, 2025
Lola T70 MK IIIB - 006 - Persistent Bodywork
August 29, 2025
Lola T70 MK IIIB - 006 - Persistent Bodywork
August 29, 2025

Repair and renewal of the Lola T70 body have been my main focus but work on the other parts is ongoing simultaneously. An occasional dry reassembly gives me a feeling of progress and a sensible check that all is going in the right direction.

Read more →
August 29, 2025
Special Edition - Ferrari 512 BB
July 25, 2025
Special Edition - Ferrari 512 BB
July 25, 2025

The Co-Hog version of the Ferrari 512 BB was introduced in 1982 and a scant 45 were made. Two were given to Enzo Ferrari (#28), and Brenda Vernor, (#29), his private secretary for 16 years (1977-1993), by the late Gary Kohs (#33). Gary was an appreciative Ferrari collector who had been granted unusual access to photograph the complete build of his 1:1 512 BB and wanted to show his appreciation.

Read more →
July 25, 2025
002a Porsche 917-10.jpg
June 13, 2025
Commission - Porsche 917-10
June 13, 2025

One of the first Co-Hog commissioned sculptures I made was the Brumos Racing Porsche 917-10/007 as raced by Peter Gregg and Hurley Haywood in Can-Am from 1972-1974. It was commissioned by a gentleman in Florida who was well-acquainted with many of the top drivers of the time.

Read more →
June 13, 2025
Lola T70 MK IIIB - 005 - Ongoing Enhancements
May 23, 2025
Lola T70 MK IIIB - 005 - Ongoing Enhancements
May 23, 2025

It took a while, but I finally decided the front end had to be improved over my original (1982) Lola T70 MK IIIB sculptural interpretation. It just didn't do justice to the voluptuousness of Tony Southgate's original design. With so much more visual information available today, I've been working on gradually creating a whole new nose.

Read more →
May 23, 2025
001 blog w border.jpg
April 25, 2025
Porsche G935 - 021 - First of Four Completed
April 25, 2025

The first of only four Co-Hog Porsche G935's has been completed. Three more will be finished, one for each of my sons and a final one that will stay in the Co-Hog collection. It has been quite a development process as I've squeezed them in with the other on-going projects over the last 3+ years.

Read more →
April 25, 2025
Special Edition - F1
February 28, 2025
Special Edition - F1
February 28, 2025

Formula One racing is about to begin again. Love it or hate it, drama at the highest-level swirls around it like a tornado. This Co-Hog Special Edition F1 distills the essence of an early 1980’s F1 race car into a 7" (18cm) long sculpture that looks like it’s ready for the coming season.

Read more →
February 28, 2025
Porsche G935 - 020 - Graphics - Clear Coat - Assembly
February 7, 2025
Porsche G935 - 020 - Graphics - Clear Coat - Assembly
February 7, 2025

The first of four Co-Hog Porsche G935's is ready for its beauty shots photography. The next three are in various stages of completion and will be finished in due time.

Read more →
February 7, 2025

EARLIER POSTS

  • Oct, 4 2024

    Go to post

  • Sep, 13 2024

    Go to post

  • Aug, 9 2024

    Go to post

  • Jul, 19 2024

    Go to post

  • Jul, 6 2024

    Go to post

  • May, 10 2024

    Go to post

  • Mar 30, 2024

    Go to post

  • Mar 1, 2024

    Go to post

  • Feb 2, 2024

    Go to post

  • Jan 12, 2024

    Go to post

  • Dec 22, 2023

    Go to post

  • Dec 9, 2023

    Go to post

  • Nov 19, 2023

    Go to post

  • Nov 10, 2023

    Go to post

  • Oct 24, 2023

    Go to post

  • Oct 6, 2023

    Go to post

  • Sep 8, 2023

    Go to post

  • Aug 18, 2023

    Go to post

  • Jul 28, 2023

    Go to post…

  • Jul 7, 2023

    Go to post…

  • Jun 23, 2023

    Go to post…

  • Jun 2, 2023

    Go to post…

  • May 5, 2023

    Go to post…

  • Apr 22, 2023

    Go to post…

  • Mar 3, 2023

    Go to post…

  • Feb 10, 2023

    Go to post…

  • Jan 6, 2023

    Go to post…

  • Dec 30, 2022

    Go to post…

  • Dec 16, 2022

    Go to post…

  • Dec 5, 2022

    Go to post…

  • Nov 4, 2022

    Go to post…

  • Oct 29, 2022

    Go to post…

  • Oct 14, 2022

    Go to post…

  • Oct 3, 2022

    Go to post…

  • Aug 29, 2022

    Go to post…

  • Aug 19, 2023

    Go to post…

  • Jul 23, 2022

    Go to post…

  • Aug 19, 2022

    Go to post…

  • June 10, 2022

    Go to post…

  • May 14, 2022

    Go to post…

  • Apr 30, 2022

    Go to post…

  • Mar 28, 2022

    Go to post…

  • Mar 12, 2022

    Go to post…

  • Mar 5, 2022

    Go to post…

  • Jan 28, 2022

    Go to the post…

  • Jan 10, 2022

    Go to the post…

  • Dec 21, 2021

    Go to post…

  • December 5, 2021

    Go to the post…

  • Nov 11, 2021

    Go to the post…

  • Oct 24, 2021

    Go to the post…

  • Oct 14, 2021

    Go to the post…

  • Oct 6, 2021

    Go to blog post…

  • Sep 4, 2021

    Go to blog post…

  • Sep 4, 2021

    Go to blog post…

  • May 29, 2021

    Go to blog post…

  • May 1, 2021

    Go to blog post…

  • Apr 17, 2021

    Go to blog post…

  • Mar 3, 2021

    Go to blog post…

Powered by Squarespace