• Porsche 935
  • Porsche 956/962
  • Commissions
  • Special Editions
  • Original Co-Hogs
  • Your Co-Hogs
  • Blog
  • Contact
  • About
Menu

Co-Hog Toys

  • Porsche 935
  • Porsche 956/962
  • Commissions
  • Special Editions
  • Original Co-Hogs
  • Your Co-Hogs
  • Blog
  • Contact
  • About
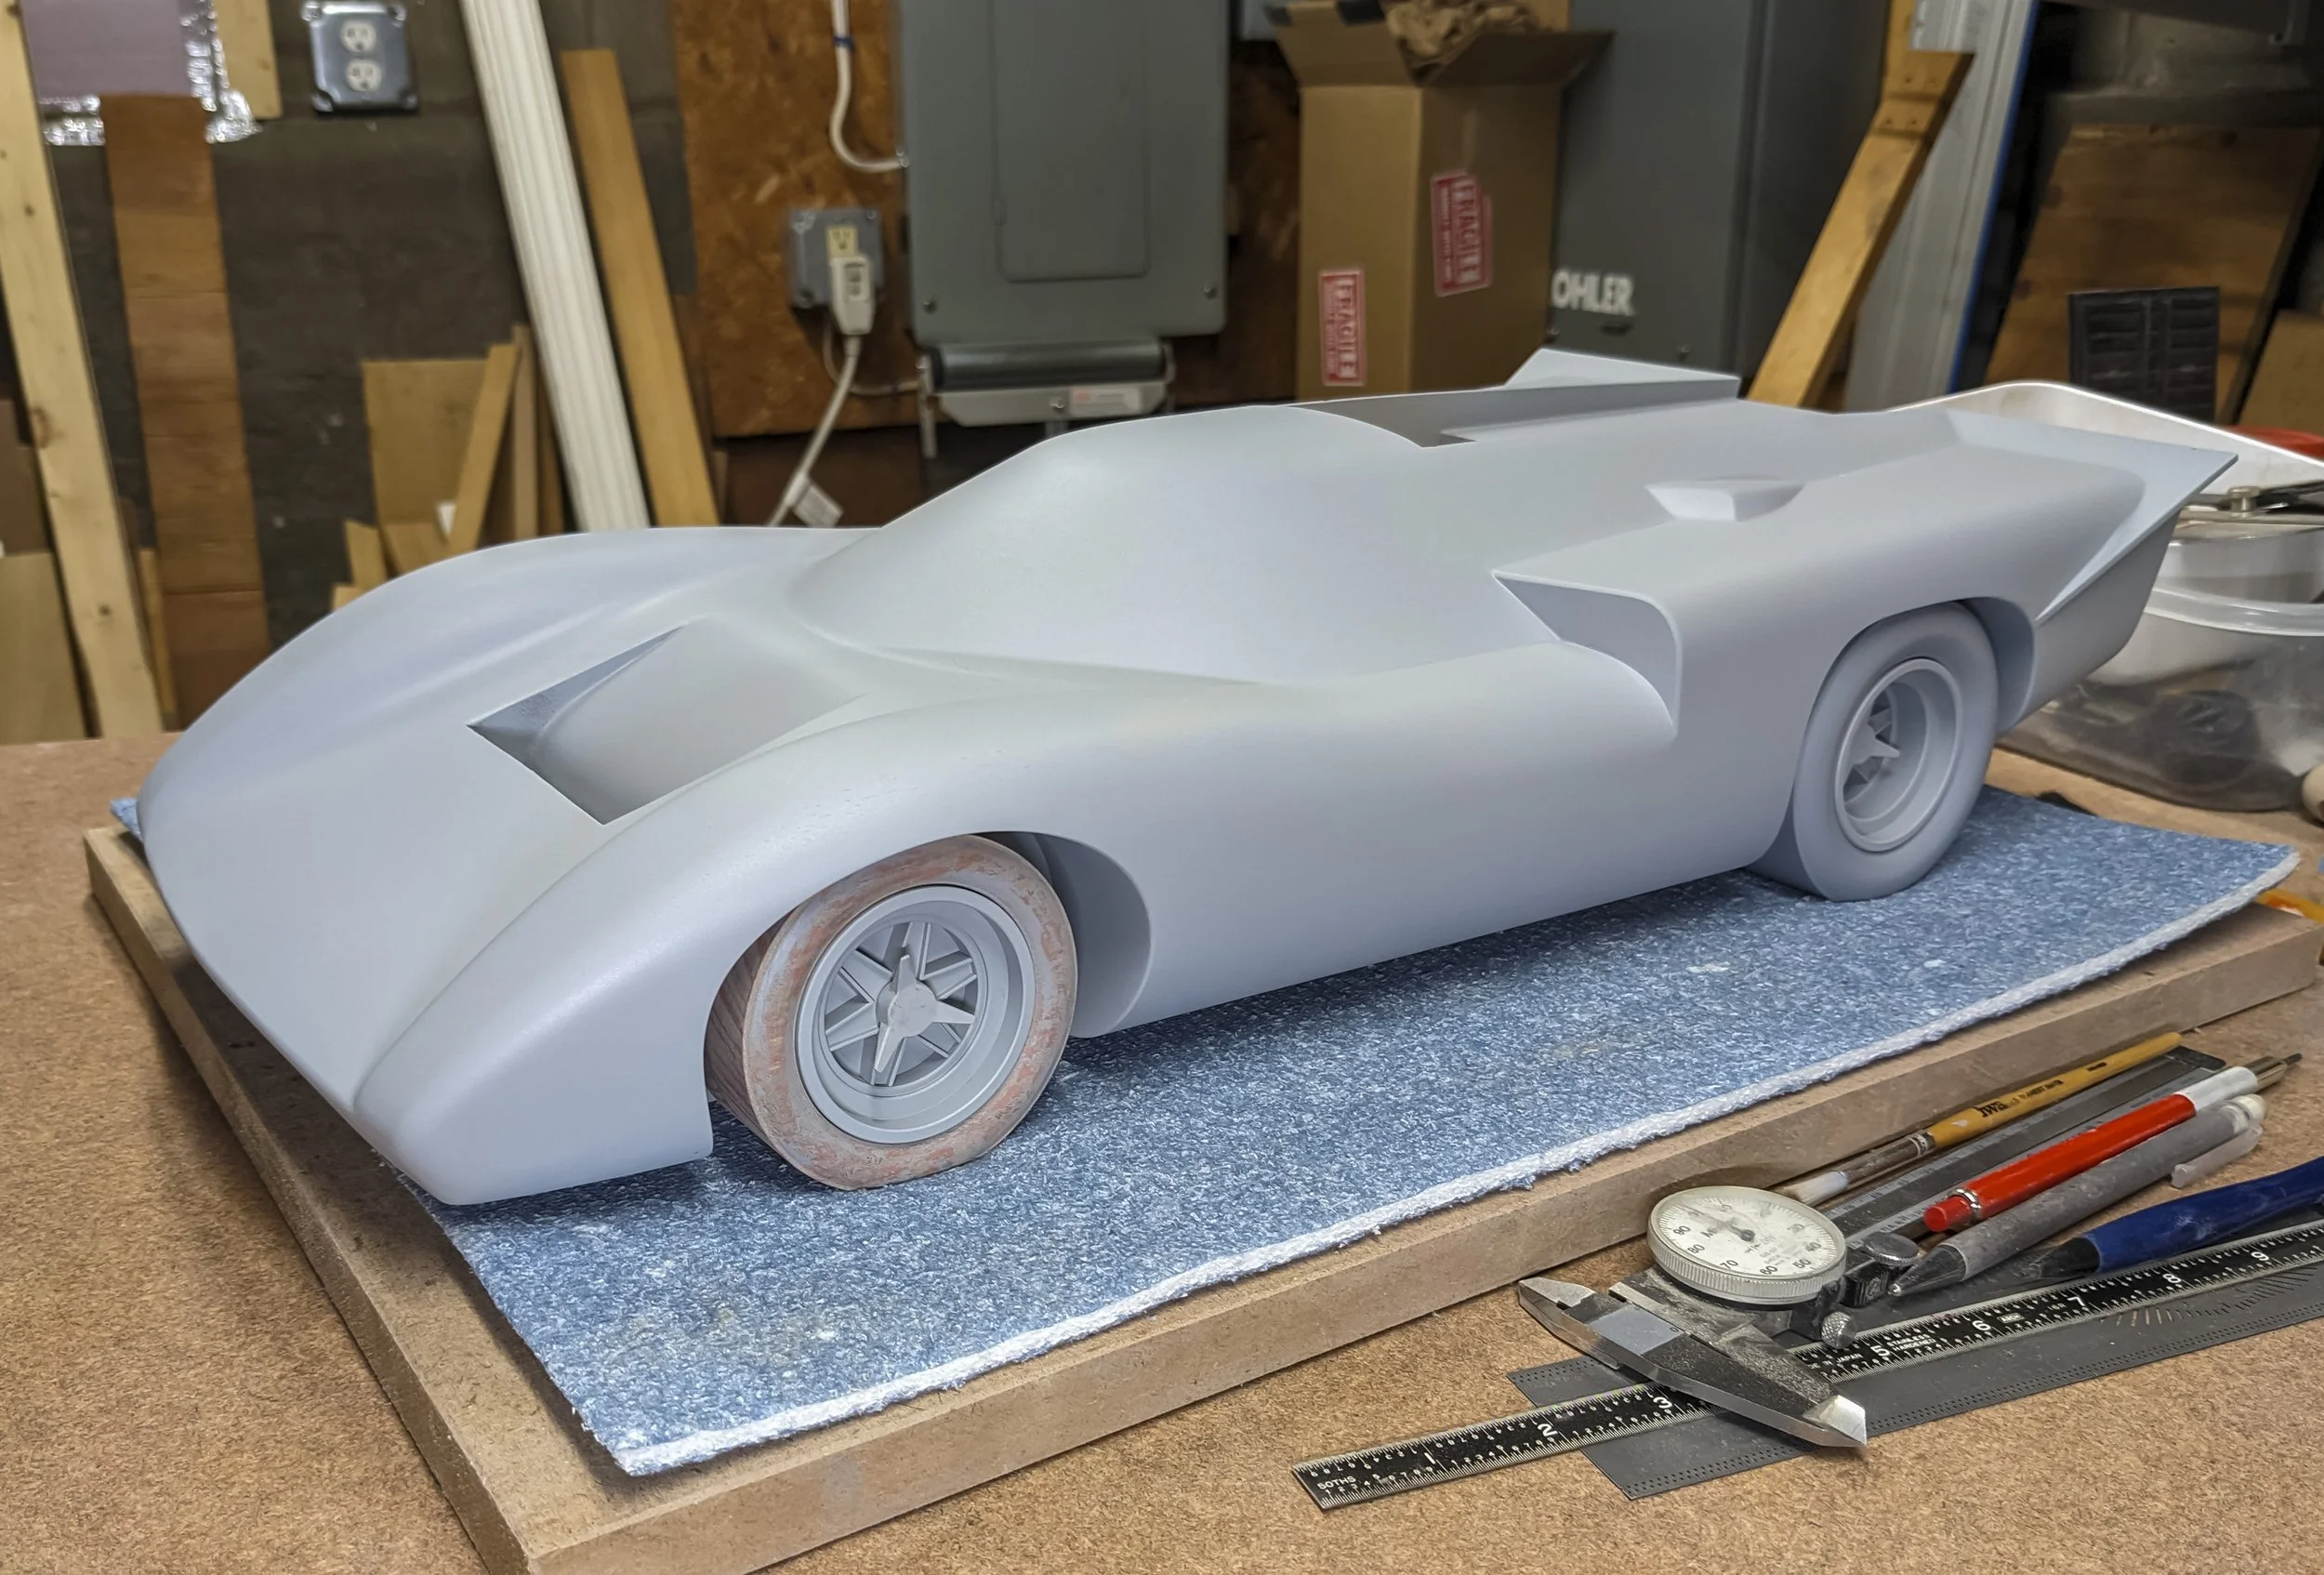
Front angled view of almost completed body dry assembled with most other restored parts.

First reassembly of all partially restored parts.

Lola T70 MK IIIB - 006 - Persistent Bodywork

August 29, 2025

dry reassembly

Repair and renewal of the Lola T70 body have been my main focus but work on the other parts is ongoing simultaneously. An occasional dry reassembly gives me a feeling of progress and a sensible check that all is going in the right direction.

Major restoration is complete and the whole body has had several coats of sealer and several of primer applied. As the front end is refined it will go through quite a few more shape/seal/prime/fill/shape cycles.

Rear angled view from higher up showing radiator opening and engine bay opening.

Sneak peek at the engine bay.

From a higher vantage point, the radiator and engine bay openings are visible. The new carburetor stacks plate is positioned and ready for finishing.

The front tire has just been through its latest sanding cycle, and the remaining red spotting/glazing material gives it the pinkish hue.

Body refinements

Front view of patterns resulting from sanding and shaping.

Each color and material change reveals the history of the shaping - jelutong, Timbermate filler, three primer colors, and glazing putty.

Surface development over time is vividly shown by all the odd shapes and colors on the front end. Jelutong shows through where the most material has been removed.

Timbermate filler used to create the hood (bonnet) bulge is tan and three different primer colors give useful concentric rings of color. As sanding proceeds the changing colors give surfacing feedback. Red spotting/glazing fills the tiniest imperfections.

Once it gets to this point it is primed again to get a true idea of what needs to be worked on next. The whole process is repeated until it is right.

Rear view showing radiator opening and fender shaping.

The radiator opening was moved back about 3/4” (1.9 cm) and the hood bulge was added.

Moving the radiator closer to the cockpit and making it deeper has been a longer process than it may seem to be. Chiseling out the proper shape, filing the resulting gap, and gradual refinement of the surfaces, corners, and edges has required a great deal of patience.

The shape of the cockpit is also very important. It must be a ruled surface all the way around. That gives minimal distortion to the windshield for better driver visibility. The joint where the cockpit meets the body is tricky as the paint removal left nicks and scrapes that need to be filled and sanded to give a clean smooth line.

Bottom view of the rear showing extensive work and new rear spoiler extensions.

The original paint has been removed from all corners, edges, and surfaces except the edge chamfer on the taillight recess.

Every tiny bit of original Sunoco Blue paint was removed from the car from nose to tail to prevent reaction with the new finishes to be applied. The rear, in particular, has been a bear. Tiny chisels and scrapers were needed to get down into the joints. Fixing the inevitable dents, dings, and scrapes is taking just slightly less than forever.

This view also shows the multi-step process of filling, sanding, and priming repeatedly. The rear spoiler plate extensions were replaced and blending them in with existing bodywork takes diligent attention.

Overall view of the car showing progress on the front end and the new rear spoiler extensions.

Yet another fender and nose shaping - 4th? 5th? 10th? - I’ll just keep going until it looks and feels right.

Because I significantly reshaped the nose, it has required the most attention. The rest of the body has been straight forward other than the paint removal.

My block sanding techniques have improved since 1982, so the result is smoother surfaces and transitions. It’s great to feel the shapes and flowing lines of Tony Southgate’s amazing forms as I work.

spotting/glazing

Overall view showing spotting/glazing on the sides and rear.

Spot glazing is applied in small sections since it dries so quickly and dissolves the primer if applied in big globs.

Jelutong pores and other small imperfections need to be filled with glazing putty to get a smooth surface. It takes a good bit of time on larger surfaces and in situations like this where every surface joint has been disturbed by the paint removal.

Fortunately, it dries fairly quickly, and sanding is easy. Shrinkage is reasonable but additional filling is often needed.

Bottom view showing the tons of spotting needed after flattening the bottom.

The bottom surface required significant sanding to flatten it, resulting in many, many spots to be filled.

The bottom required the most sanding to get it back to flat. This is the third (at least) filling needed.

After each priming new divots to be filled are discovered . Every step forward leads to an even closer inspection, so it’s normal to see more things to fix.

so many tools NEEDED

Some of the multitude of tools used in working on the body restoration.

Just a few of the many tools used for the bodywork.

This shows the wide variety of tools needed to make things right. At this point I’ve smoothed the whole body up to 400 grit. I have to label the bits of sandpaper to keep from grabbing the wrong one (220, 320, or 400).

I made multiple sanding blocks using different thicknesses of acrylic shaped to fit specific needs. I also use styrene, 3D printed PLA, carbon fiber strips, brass, steel, rubber, dowels, and whatever else works. Sanding sticks come in handy for just the right situation. Flexible sanding sheets and semi rigid sanding foams are great for the curves.

A diamond coated file, steel scraper and the tiny chisels also have their place. The red Dspiae oscillating sanding tool isn’t all that useful in such finicky work as this, but it does occasionally prove its worth.

I’ll smooth everything up to 800 grit with a final 1200 grit sanding before the Sunoco Blue paint is applied. After painting the sanding continues up the grit ladder until it’s ready for graphics to be added and then 2K clear.

Stubborn persistence is what it takes to get the bodywork and all the details just right.


Links to previous Lola T70 posts are below:

- Lola T70 MK IIIB - 005 - Ongoing Enhancements

- Lola T70 MK IIIB - 004 - Cutting Tire Profiles

- Lola T70 MK IIIB - 003 - Searching For Symmetry

- Lola T70 MK IIIB - 002 - Restoration Progress

- Lola T70 MK IIIB - 001 - Restoration Started


Back to top
← Lola T70 MK IIIB - 007 - Stance MattersSpecial Edition - Ferrari 512 BB →

Latest Posts

Featured
Special Edition - Mercedes-Benz 380SEC AMG
May 8, 2026
Special Edition - Mercedes-Benz 380SEC AMG
May 8, 2026

AMG came on in a big way in the late 60s by building exquisite racing engines. By the mid-70s they were tuning select Mercedes-Benz models into absolute beasts. The combination of a fierce engine and finely tuned suspension mods with more aggressive bodywork led to more than a few unsuspecting drivers wondering what the devil had just passed them.

Read more →
May 8, 2026
Lola T70 MK IIIB - 008 - Headlights Hurdle
February 6, 2026
Lola T70 MK IIIB - 008 - Headlights Hurdle
February 6, 2026

As you might surmise, there are no straight lines surrounding the Lola T70 Mk IIIB Coupe headlights. Such a sensuous body demands curves just about everywhere. Three-dimensional curvilinear lines abound. The original 1982 version of the Co-Hog Lola had subtle grooves to delineate the headlight shapes. The resulting interior surfaces were then painted silver. Seems it would be a simple proposition to duplicate the idea on the totally reshaped nose of this restored version. There was only one problem - I’d forgotten how I did them 40-odd years ago!

Read more →
February 6, 2026
Lola T70 MK IIIB - 007 - Stance Matters
October 3, 2025
Lola T70 MK IIIB - 007 - Stance Matters
October 3, 2025

Race cars have a stance that instantly catches and holds the eye. This effect is created by the relationship between the wheels and tires to the forms surrounding them. Aggressive, low, and ready to attack. The Lola T70 Mk IIIB Coupe is one of racing’s most sensuous race cars. It relies on its stance to help accomplish that.

Read more →
October 3, 2025
Lola T70 MK IIIB - 006 - Persistent Bodywork
August 29, 2025
Lola T70 MK IIIB - 006 - Persistent Bodywork
August 29, 2025

Repair and renewal of the Lola T70 body have been my main focus but work on the other parts is ongoing simultaneously. An occasional dry reassembly gives me a feeling of progress and a sensible check that all is going in the right direction.

Read more →
August 29, 2025
Special Edition - Ferrari 512 BB
July 25, 2025
Special Edition - Ferrari 512 BB
July 25, 2025

The Co-Hog version of the Ferrari 512 BB was introduced in 1982 and a scant 45 were made. Two were given to Enzo Ferrari (#28), and Brenda Vernor, (#29), his private secretary for 16 years (1977-1993), by the late Gary Kohs (#33). Gary was an appreciative Ferrari collector who had been granted unusual access to photograph the complete build of his 1:1 512 BB and wanted to show his appreciation.

Read more →
July 25, 2025
002a Porsche 917-10.jpg
June 13, 2025
Commission - Porsche 917-10
June 13, 2025

One of the first Co-Hog commissioned sculptures I made was the Brumos Racing Porsche 917-10/007 as raced by Peter Gregg and Hurley Haywood in Can-Am from 1972-1974. It was commissioned by a gentleman in Florida who was well-acquainted with many of the top drivers of the time.

Read more →
June 13, 2025
Lola T70 MK IIIB - 005 - Ongoing Enhancements
May 23, 2025
Lola T70 MK IIIB - 005 - Ongoing Enhancements
May 23, 2025

It took a while, but I finally decided the front end had to be improved over my original (1982) Lola T70 MK IIIB sculptural interpretation. It just didn't do justice to the voluptuousness of Tony Southgate's original design. With so much more visual information available today, I've been working on gradually creating a whole new nose.

Read more →
May 23, 2025
001 blog w border.jpg
April 25, 2025
Porsche G935 - 021 - First of Four Completed
April 25, 2025

The first of only four Co-Hog Porsche G935's has been completed. Three more will be finished, one for each of my sons and a final one that will stay in the Co-Hog collection. It has been quite a development process as I've squeezed them in with the other on-going projects over the last 3+ years.

Read more →
April 25, 2025
Special Edition - F1
February 28, 2025
Special Edition - F1
February 28, 2025

Formula One racing is about to begin again. Love it or hate it, drama at the highest-level swirls around it like a tornado. This Co-Hog Special Edition F1 distills the essence of an early 1980’s F1 race car into a 7" (18cm) long sculpture that looks like it’s ready for the coming season.

Read more →
February 28, 2025
Porsche G935 - 020 - Graphics - Clear Coat - Assembly
February 7, 2025
Porsche G935 - 020 - Graphics - Clear Coat - Assembly
February 7, 2025

The first of four Co-Hog Porsche G935's is ready for its beauty shots photography. The next three are in various stages of completion and will be finished in due time.

Read more →
February 7, 2025

EARLIER POSTS

  • Oct, 4 2024

    Go to post

  • Sep, 13 2024

    Go to post

  • Aug, 9 2024

    Go to post

  • Jul, 19 2024

    Go to post

  • Jul, 6 2024

    Go to post

  • May, 10 2024

    Go to post

  • Mar 30, 2024

    Go to post

  • Mar 1, 2024

    Go to post

  • Feb 2, 2024

    Go to post

  • Jan 12, 2024

    Go to post

  • Dec 22, 2023

    Go to post

  • Dec 9, 2023

    Go to post

  • Nov 19, 2023

    Go to post

  • Nov 10, 2023

    Go to post

  • Oct 24, 2023

    Go to post

  • Oct 6, 2023

    Go to post

  • Sep 8, 2023

    Go to post

  • Aug 18, 2023

    Go to post

  • Jul 28, 2023

    Go to post…

  • Jul 7, 2023

    Go to post…

  • Jun 23, 2023

    Go to post…

  • Jun 2, 2023

    Go to post…

  • May 5, 2023

    Go to post…

  • Apr 22, 2023

    Go to post…

  • Mar 3, 2023

    Go to post…

  • Feb 10, 2023

    Go to post…

  • Jan 6, 2023

    Go to post…

  • Dec 30, 2022

    Go to post…

  • Dec 16, 2022

    Go to post…

  • Dec 5, 2022

    Go to post…

  • Nov 4, 2022

    Go to post…

  • Oct 29, 2022

    Go to post…

  • Oct 14, 2022

    Go to post…

  • Oct 3, 2022

    Go to post…

  • Aug 29, 2022

    Go to post…

  • Aug 19, 2023

    Go to post…

  • Jul 23, 2022

    Go to post…

  • Aug 19, 2022

    Go to post…

  • June 10, 2022

    Go to post…

  • May 14, 2022

    Go to post…

  • Apr 30, 2022

    Go to post…

  • Mar 28, 2022

    Go to post…

  • Mar 12, 2022

    Go to post…

  • Mar 5, 2022

    Go to post…

  • Jan 28, 2022

    Go to the post…

  • Jan 10, 2022

    Go to the post…

  • Dec 21, 2021

    Go to post…

  • December 5, 2021

    Go to the post…

  • Nov 11, 2021

    Go to the post…

  • Oct 24, 2021

    Go to the post…

  • Oct 14, 2021

    Go to the post…

  • Oct 6, 2021

    Go to blog post…

  • Sep 4, 2021

    Go to blog post…

  • Sep 4, 2021

    Go to blog post…

  • May 29, 2021

    Go to blog post…

  • May 1, 2021

    Go to blog post…

  • Apr 17, 2021

    Go to blog post…

  • Mar 3, 2021

    Go to blog post…

Powered by Squarespace